Assignment 3 - Reflection
Reflection
Demonstration and reflection of the Bowl -
I decided to have another attempt at shaping the bowl.
I enjoyed making the bowl in class however as it was the first task of the semester I wanted to re attempt shaping the bowl now that I am a more experienced metal shaper.
I was intrigued to see how efficiently I could shape the bowl doing it a second time and how much better I could make it and preferably deeper.
First Attempt
My first attempt at the bowl at the beginning of the semester taught me the repetitive process of going between the sand bag, the wooden stump and the english wheel to establish the desired shape.
It proved to me the difficulty of maintaining the shape or radius you are trying to achieve as when rolling out the dints from the hammering process I almost always lost the shape and radius I was after.
My first attempt at the bowl I aimed for the middle radius of 155 however ended up achieving the deepest radius of 125 as a result of the repetitive hammering and rolling of the metal. However I much preferred the deeper radius and if it weren't part of the assessment would have aimed for one even smaller.
I used four different sized concentric rings as a guide for the shaping of this bowl. I began the shaping of this bowl differently to what was advised as all the sand bags were already taken. So I started from the inside ring using a rubber mallet and the wooden stump to begin shaping. Due to this the bowl took a bit longer to shape and would have been a lot more efficient starting from the outside and working my way in.
Second Attempt
My second attempt of the bowl was a much more pleasant experience as I was more comfortable with the tools and there were a lot more available.
My aim for the second attempt at the bowl was to:
1. Complete the task more efficiently
2. Shape the metal more evenlly
3. Achieve a deeper radius
- Originally I wanted to create something much smaller however after a few whacks with the rubber mallet I soon realised this was unlikely achievable with my current shaping skills and patience.
- So I decided to make the bowl a bit larger but still smaller then the first bowl. I decided I would cut the bowl as I worked to create one smaller allowing me to shape the metal with a larger surface but still achieve the small sized bowl I was hoping for.
- I created a paper template with a diameter of 220mm which I then used to trace the outline onto the piece of metal, this replaced the step of the laser cut wooden templates used in attempt one and worked just as well. The laser cut templates would be more efficient if creating multiple bowls of the same size however just to make one I found it a lot more efficient to quickly draw up my templets on paper.
- I used the large metal cutter to cut the the outline of the circle and tidied it up with the tinsips for an accurate finish which is a step I left out in attempt one leaving me with and uneven edge finish
 |
| (Tiding up with tin snips) |
(Measuring diameter) (Paper template) (Cutting outline)
- I marked out concentric rings to guide my shaping process, using the cylindrical stump in the workshop and the base of a bottle
Shaping
- This attempt I began from the outside in with the sandbag to start using the rubber mallet
- I soon swapped to the metal mallet as its a lot heavier and therefore quicker to achieve the shape
- When the edges began to fold I would roll the metal out on the english wheel and keep repeating this process to create a deeper bowl
- As my bowl was getting deeper I would trim the edges using the tin snips to create the smaller bowl which I desired
- trimming the bowl as I went allowed me to keep enough surface area to achieve the depth I wanted
- As my bowl was becoming more curved and ready for a deeper radius I started to replace the sand bag with the wooden stump and continued using the metal mallet
- I would then hit our the parts begging to fold on the sand bag trying to maintain the raidus
- Next I would roll out on the english wheel and repeat the process again
- I found that adding in the extra step of hitting out the folds before using the english wheel allowed the curve to be maintained which is an issue I faced in attempt one where I found every time I would try and get rid of the folds my radius would become too flat and I ended up in a rut of repeating the process however not progressing to a deeper radius
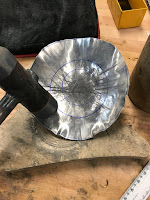
- Once my bowl was at the stage pictured below, I found it hard to progress to a deeper shaped bowl
- I think this stunt in the process was due to it fitting comfortably in the dint in the stump therefore a deeper dint in a stump would have been helpful to use once reaching this stage
DISASTER
- I trimmed my bowl over the wooden stump and forgot to clear the clippings off before using again
- Resulting in a split in the metal when I went to hit it in the stump again
- This mistake is something I definitely would not make again as I would be more careful with the clippings when trimming my bowl
- However as my aims for this metal shaping task was to shape the bowl more efficiently and with a deeper radius and luckily was not to make a cereal bowl
- So I continued working on this bowl
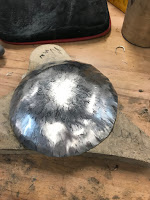
- I was happy with the shape my bowl had formed so I decided to clean off the rings I had marking inside as guides
- I then continued using the technique of the wooden stump, sandbag and english wheel however without the guides I was able to focus more on the areas which seemed uneven and overall create a deeper bowl
Finish
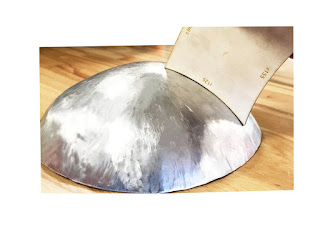
- I finalised the shaping of the bowl on the english wheel
- Filed the edges
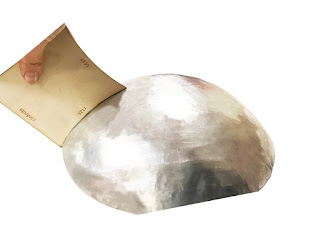
- Sanded the inside and outside and then polished the inside and outside using silvo
- In my first attempt of the bowl I didn't pay to much attention to the finish however after completing the various tasks throughout the semester the fuel tank in particular I gained an appreciation for putting effort into the finish of the metal as it creates a much smoother and shinier surface
Overall I was pleased with how my second attempt at the bowl turned out. However was disappointed with the slip up creating the split in the metal.
- My first attempt at the bowl took approximately 3 hours and my second attempt took just under 2
- Starting from the outside and working my way in definitely allowed me to achieve a deeper shape quicker than the opposite way which I did in attempt 1
- The use of the metal mallet instead of the rubber mallet used in attempt 1 was much more successful in creating a deeper shape as its a lot heavier
- The use of a polish at the end created a smoother and shinier finish
Reflection on my discipline - Landscape Architecture
Overall I feel this Beil course has been useful to my discipline in many aspects. In particular the combination of digital making and practical making has challenged my thinking. The tasks performed in assignment 1 introduced me to various techniques of metal shaping helping me to understand shape and form a lot better particularly organic and curved shapes which are very relevant to my understanding of landscape as well as my style of designing. My skills of shaping metal were improved over the course and have lead me to consider using it in my model making tasks throughout my degree especially through the torus and its reverse curve as well as the bowl for its minimalistic look a shapes that I now appreciate a lot more and have been thinking about in my detail landscape designs in terms of furniture and other landscape and sculptural elements.
In the group work of the fuel tank I found it helpful to be working with a mix of disciplines. Being a landscape architecture student I wanted to use the photogrammetry software to capture our fuel tank prototype as It seemed like an effective software to be used for landscape purposes as it enables unique shapes and curves to be captured and modelled. This software would also be usefull to other disciplines such as industrial design for unique products they need to prototype as well as architects for curvature structures they may want to model however I'm not sure how suitable it would be to an interior architect.
One of the challenges in this course was that you always had to consider the process and plan ahead which is a skill that applies to all design disciplines. Specifically to this course we did so by making templates, using softwares to create models and creating our own corking tools to achieve the shapes we wanted. These processes have increased my awareness of the complexity of shaping metal, an shaping forms that may seem simple to an unexperienced eye which I think relates greatly to my discipline and the establishment of landscapes over time where the processes always need to be considered from the beginning of the design stage thinking about construction of the landscape the elements and then the time the landscape is used before its fully established.
On a more practical level this course has really contributed to my knowledge of making with both metal and wood by laser cutting wood templates, shaping corking tools and shaping of metal. After completing the first two assignments I was a lot more confident in the workshop and ended up using the laser cutters, ban saw and sander to create my landscape model for my studio course.


Comments
Post a Comment