Posts

The Blister

Image
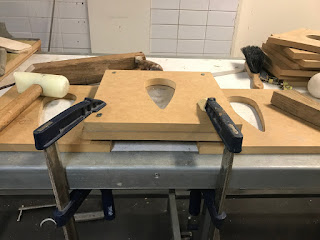
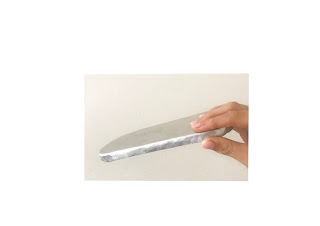
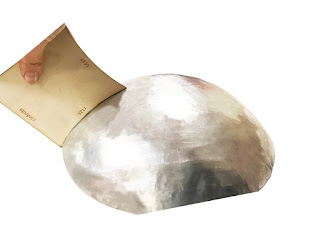
Week 6 - The blister The blister was our final task. I found this one the easiest probably due to my experience so far with metal shaping as well as the fact it was just hitting one area and there was no chance of creating folds which I found difficult in the previous tasks particularly the tray. This task was enjoyable as it allowed us to make and use our own metal shaping tools using the ban saw and electric sanders. I bolted two pieces of wood around the metal to avoid wrinkles when shaping the metal however this meant the metal would be prone to splitting. I clamped wood and metal on top o two other pieces of wood leaving the gap for the blister open as I wasn't sure how far out the blister would come through the gap in the wood and I thought if I was hitter the blister onto the surface of the table the metal might harden quicker making the refining of the blister more difficult.. To avoid splitting my metal using this technique I made sure I was hitting it softly but for...

The Tray

Image
Week 5 - The Tray The tray was the third task and the most difficult for me. This exercise was challenging as it was in partners therefore the trays had to match up to each other with the same radius curved edges meaning if you made a mistake or hit something too far you couldn't just change radius like the bowl. This exercise required more setting up as we needed to clamp the metal between two bits of wood that we shaped on the electric sander. This task was annoying and took the longest as it was the most difficult to refine because every time I would hit the metal using with the hammer it would move even though it was clamped. This task took two attempts as my first try the edges resulted in folds on the corner. A positive thing about this task was the idea from it of making your own stencil quickly from wood that can be used to form the metal into the desired shape. My partners tray got stuck onto the wood therefore I knew to be wearing when finishing my final corner and ...

The Torus

Image
Week 4 - The Torus  The second task was to create a reverse curve which is called a Torus. Like the effects of the english wheel reversing the radius which had just been shaped, the torus was similar as every time you would swap to the opposite curve the other would begin to flatten out therefore this task was quite challenging to create a finished product which was sufficient in both the middle curve and the two outside curves. The reverse curve seemed like the most challenging shape to form however having access to the tools and objects in the workshop made it quite easy if you used the right thing which was often things I wouldn't consider using therefore I'm glad we did this task as I have now thought about new ways of creating shapes. I began by shrinking the centre strip using the wooden stump inside the clamp and bashing the marked out centre with a hammer. I also used the curved metal cylinder which is on a stand to roll over the edges of the reverse curve making th...

The Bowl

Image
Week 3 - The Bowl  The bowl was the first task given in this class and was quite challenging because of my little experience with metal shaping. The task was enjoyable and taught me techniques such as bending and shrinking metal as well as being introduced to the english wheel which I think will be helpful in the future for refining any objects I've made out of metal.  Using the laser cut concentric rings I was able to form the bowl shape quickly aiming to create a radius of 155. However whilst trying to create a more even and flat surface of the bowl without so many dints I soon had to aim for the deeper radius of 125. I ended up preferring this radius as it looked more bowl shaped rather than a shallow dish. I used the sand bag to begin which I found the most difficult to shape the dish form leaving me moving on to the wooden stump a bit too early. I then had to go back and forth between the sand bag and the stump until I had a bowl like shape. Then finishing off wit...